Wednesday 29 April 2020

WHAT DO WE KNOW ABOUT THE CODE PAGE? PART 2


THE CODE PAGE


This version of the code page is one I downloaded originally from the Adelaide University WIKI. 

They, in turn, had obtained this image from the Adelaide Advertiser, the only proven true source of the image.

We know the following about it:

1. The physical dimensions of the image are 11.44 cms X 9.14 cms this approximates to the same physical size of a page of the Whitcombe and Tombs edition of the Rubaiyat of Omar Khayyam shown in the earlier post. See part 1 of this post.

2. Dimensions of the image in pixels: 1802 X 1440

2. The image resolution is 157.48 pixels per cm. or 400 pixels per inch, that means that in a 1-inch square space, there are 400 X 400 pixels = 160,000 pixels per square inch

3. The file size of this image is 2.6 megapixels. (2,600,000 pixels)

4. The print resolution is 400 dots per inch, or 1 dot for each pixel.

Analysis of the image:


This is the original file, it is the only one of its kind. All other image files of the code page that you can see on the web came from this one.

THE TORN PIECE

In Part 3 of this series, we will look at the Tamam Shud slip of paper that was found tightly rolled up in a hard to find fob pocket of the trousers worn by the Somerton Man when he was found on the beach:


Share:

VERSE 70, INFRARED, NUMBER STRING HIDDEN IN PLAIN SIGHT PART 1.


HIDDEN IN PLAIN SIGHT

A Lesson in Clandestine Communication and Concealment

1. The first image shows a closeup of the top left corner of the page where Verse 70 was inscribed under normal ambient light.


2. The second image is the same basic pic but taken under Infrared, here you can see a string of numbers stretching across the top of the book cover


There are more images from Verse 70 to be added in an update including a surprising error made by the person who set up Verse 70.
Share:

WHAT DO YOU SEE? A QUIZ OF SORTS...


A QUIZ OF SORTS..

A couple of recent images here, first is the top right corner of the code page in close up and inverted so that it's viewed from the top of the page downward.
 
What do you see?


This next image is of the Boxall book inscription and title pages, there is something odd about the inscription page and it's always been there but overlooked time and time again. It's one of those things I have known about but kept it to one side to see if anyone would notice it.

What do you see that's out of place? (You might want to download it and view it under magnification although it is actually just visible even at this size here's the link..


Share:

Tuesday 28 April 2020

WHAT DO WE KNOW ABOUT THE CODE PAGE? PART 1.


PART 1. THE CODE PAGE AND
THE RUBAIYAT OF OMAR KHAYYAM

We can't really talk about the code page without first learning as much as we can about the copy of the Rubaiyat of Omar Khayam that was found and associated with the Somerton Man. This association was made by virtue of the small slip of paper, the 'torn piece' found rolled up tightly and pushed down into a hard to find fob pocket of the Somerton Man's trousers. It was on a page of this book that was found a written, supposed, code and some telephone numbers.

First, The Rubaiyat:


This is a copy of a similar book, it was published by New Zealand Company, Whitcombe and Tombs around 1941. The Rubaiyat was translated by Edward Fitzgerald.

Below is an image of the outer dust cover for the book, you can see that it belonged to the Courage and Friendship series.


Some more facts:


The first known adverts for this book appeared in a Sydney Newspaper in 1942.

The series was published in a range of pale colours featuring two colours in a copy.

The edges of the book cover were 'YAPPED', that is they were slightly bent over and inwards to protect the edges of the pages. You should be able to see the outline of the Yapp around the edges of the cover in the image above. The pages themselves were not 'yapped'

The dimensions of the book inside the dustcover were 22.5 cms wide across the opened pages, a single page, therefore, measured 11.25 cms 9.0 cms.

The dimensions of the image file of the code page as supplied initially by the Adelaide Advertiser, are 11.44 cms X 9.14 cms. This image file is available for download from this blog or from the Adelaide University Wiki site.

The book was originally found on the back seat of a car parked in Jetty Road Glenelg. The book was most recently said to have been found by a local Chemist named Freeman, another version says it was found by his brother in law who placed it in the glovebox.

The date it was found towards the end of November 1948, around the time of the local, Parafield Air Show.

Following an appeal, the book was eventually handed in to the SA Police on 22nd July 1949, after the Somerton Man's first inquest hearing.

Police documents from the time make no mention of there being a dustcover found with the book.

The Somerton Man book was said to have been white in colour, no other white coloured edition of the Courage and Friendship series have been found.

Newspaper article:                                                                                              Torn Slip


Police image of the book


The image to the right shows a page from a Courage and Friendship series Rubaiyat with an image of the torn slip overlaid. Both book and slip are to scale.

The shape of the torn piece does not match the shape of the torn out area.

A scientist stated at the time that the type of paper in the slip was 'similar' to the type of paper used in the book.

A Police report from 1949 says of the book that the 'back leaf was missing'. In bookbinding terms, a 'leaf' is comprised of two pages. Books are bound in sets of two pages.

The assumption is made that the Detective Sergeant who wrote the report was referring to the last, back, page of the book.

Bear in mind that if the back page was missing then the other half of that page would have been the front page of the book

In a discussion with Gerry Feltus, he made it clear to me that there were 'pencil markings' on the code page and that these 'markings' were indentations left by someone writing in pencil on yet another page and by pressing the pencil down in order to write, left indentations on the page beneath.

This being so, then the back leaf would more than likely be the page on which the code was originally written and the next page in the book would have had the indentations which, using specialised techniques, the Police recovered.


Code Page Orientation Relative To The Book.

Note the partial view of the code page. It shows that the orientation of the book when the code was written would have been portrait and not landscape as per this image.


The orientation shown on the left has the top of the code page is close to the centre joining point with the book.

Another option is that the top of the code page was on the outer edge of the book and the difference in shading that you see at the top is from the YAPPED edge.

The book pages were not yapped, the cover was thus the orientation shown on the left is more likely to be correct.

Here's a download link to the full PDF copy of the Whitcombe and Tombs, Courage & Friendship Rubaiyat

GO TO PART 2 OF THIS POST


Share:

Sunday 26 April 2020

GALLIPOLI FROM ABOVE


GALLIPOLI FROM ABOVE

A Documentary by Hugh Dolan

An Intelligence Perspective

The story of events leading up to the landings at Gallipoli ANZAC and British Forces and their eventual withdrawal.

Did the British deliberately send the ANZACS into a high-risk landing with little hope of success? Were they totally unprepared?

This video provides the answers to those questions and more, it tells of the roles of the Royal Naval Air Service, Australian Military Intelligence and of a betrayal by a British spy who confessed his wrongdoing to avoid the hangman's noose, but was there more to that story?

It's an amazing story and it's compulsive viewing, I highly recommend this video documentary to our followers.


HUGH DOLAN is a former intelligence officer with the Royal Australian Air Force. Apart from the documentary, Hugh has also created a series of historical graphic novels, including Gallipoli: The Landing (2014) and Reg Saunders: An Indigenous War Hero (2015), and the author of 36 Days: The untold story behind the Gallipoli landings (2010).

Share:

Wednesday 22 April 2020

INFRARED: QUESTIONED DOCUMENT EXAMINATION, TURNING YOUR MOBILE PHONE INTO AN INFRARED CAMERA AT NO COST


MOBILE PHONE TO
INFRARED CAMERA

A Document Examination Tool

OBSCURED WRITING

INFRARED RADIATION


The above images show a good example of IR radiation and its capabilities. Words and letters can be almost totally obscured and yet under the right lighting conditions and with the right camera equipment, this is what Infrared can do.

Sadly, the cost of such equipment is out of range for many of us so we have to find other ways.


AFFORDABLE INFRARED: MOBILE PHONE TO IR CAMERA 

3 STEPS TO TEST AND INSTALL

It may not sound right but it is a fact,  many mobile phones are already infrared capable. True to say that manufacturers do block IR on most of their models but the block, it turns out, isn't that effective. To be more precise the proper term is 'near-infrared'.

Here are a couple of images non SM related to give you an idea of what your mobile can do. I have used my own Samsung S9+ for this exercise.

Step 1. To find out if your mobile can do this job and a simple way to find out is to grab your TV remote point it at your mobile phone camera and then select one of the controls on the remote, volume for example, and through the view screen on your phone you should see something like this:


What you are looking at is the infrared lamp on your remote and you can see it quite clearly. Normally you wouldn't see the coloured lamp because the colour is outside the normal range of human vision. It's infrared. If you see this, then your phone is IR capable.

Step 2. You need to download an app to your mobile phone, it's called 'Seek Thermal', it's free and it is normally used in conjunction with the Seek thermal adapter for your mobile phone which costs around four hundred dollars. You get the app from Google Play and its available for Android and iPhone devices.

Step 3. I discovered this by accident having first tried to take an IR pic through the normal camera option on my phone. Go back to Google Play and install another app called 'Magnifier Plus', you'll find a number of similar apps, you need to select one that has an incorporated flashlight which you can use as an option when taking IR pics if needed.

And that's it, maybe 5 minutes and your IR camera phone is good to go.

I have used this extensively to examine numerous documents from the Somerton Man case, i have published some with more to come.  To boost the performance I have ordered an infrared lens that I can attach to the phone which should result in sharper images.

Below is an IR image of the view from my deck:


 And here is a shot of my hand to give you a better idea of the sort of details Infrared will show up:


Share:

Monday 20 April 2020

INFRARED: WHAT THE HELL IS THIS? UPDATED


INFRARED:
A PUZZLING IMAGE OF HIDDEN WRITING?


These images were a complete surprise. I had been working on two methods of developing any hidden information on the Verse 70 page, first was to use bleach to remove thin layers of ink and then once that was done I used the IR technique discussed in previous posts. I pointed out then that the kit isn't complete, in fact, I am waiting for some IR filters which should drastically improve the output.

I have no idea where this apparent writing came from and I am not making any claims at this stage. It only shows up under Infrared, (No filter), the first image is actually how it appears when first photographed with IR, it is negative.


This next image has been inverted so it is the positive version of the image above:


The writing, if that's what it is, starts at the edge of the cover to the left and stretches through the hat image of the lady with the fez and then further across to the right-hand edge.

I have looked to see if there's any cross-contamination from another document but I have no other docs that were handwritten which this appears to be. There are multiple lines that look to be in pairs but they are not equidistant. I will repeat the process and see what happens next time around and post on that tomorrow.

Incidentally, the bright writing at the top of the pages is from the last line of Verse 70.

There may be a simple explanation but right now it remains something of a mystery!

MYSTERY SOLVED

Well, in reality, I knew what it was but wanted to use this as a lead into the issues of the steps that you go through when you're examining  'questioned documents'. It is not as straight forward as it may seem. The process involves a range of equipment, a range of settings and occasionally software. In earlier days there was more reliance on software but as euipment, notably cameras and lighting needs advanced there has been less and less reliance on software tools. In fact almost zero. 

So the solution to the mysetry is that the markings shown on this image commonly occur when you change ink cartridges in inkjet printers. Why inkjet printers? I will address that and other equipment used in a separate post. The problem is fixed by running the head cleaning routine that you will find in your printers software. Whilst you are doing that, you may as well run the other diagnostic tools in the printer software.


Share:

Friday 17 April 2020

INFRARED: VERSE 70, ALF BOXALL COPY, HIDDEN CODE REVEALED


THE RUBAIYAT OF OMAR KHAYYAM
THE BOXALL COPY

Hidden letters and numbers within the larger letters on the title page, 
the exact same method as used on the Somerton Man code page.


Above is an image of the Verse 70 inscription and the title page from Alf Boxall's copy of the 'Rubaiyat of Omar Khayyam'. You'll notice that I have highlighted or marked up the word 'RUBAIYAT' on the title page.

I have spent many hours over the years reviewing this copy and have shown evidence of micro writing hidden in the words, the verse and in the number 70. In fact, hidden code letters and numbers are also to be found in the image of the lady with the Fez.

Using the newfound infrared capability, I have taken a close up of the word RUBAIYAT as shown below:


Visible micro written letters and numbers are seen in the 4 marked-up letters. In fact, they exist in each letter and are to be found in every letter and word on this page.

Every letter, handwritten and printed as well as the number 70 and the image of the lady with the Fez on the verse page and the bunch of grapes on the title page contain micro written letters and numbers. This had to be far more than a game of writing tiny letters, the technique is extensively used in every possible location, it was a concerted and focused effort.

My view is that the book and verse 70 was used as a training exercise for Jess. Boxall was the trainer.  The proof is here and it represents yet another significant breakthrough.

The good news is that anyone can use the image of these pages, supplied to me by Professor Abbott some years ago, to find what I have found here. The other good nes is that I have a copy of the same edition of this book as does Barry Traish and I can say, without hesitation, that the micro writing shown here does not appear in my edition.


Share:

Thursday 16 April 2020

INFRARED: THE CODE PAGE EXAMINED PARTIAL IMPLEMENTATION RESULTS


THE CODE PAGE EXAMINED

INFRARED PARTIAL IMPLEMENTATION


MIR 1

MIR 2

The above two images are from a first attempt using infrared. Its early days as yet and the tools used were not fully implemented at this stage, there's a fair bit of work to do to get it all up to speed.

Whilst the images are a little faint and grainy, you should be able to make out many of the letters and numbers contained within the letters and lines.

MIR 1: Note the letters S T & G and the 'flourish' beneath.

MIR 2: Note the crossed lines and the A Q & C. I also found the area above the Q & C and to the right and above the crossed lines to be intriguing.

It may be a little while before I publish more of these results, the aim is to become more proficient in the use of the equipment and software.
Share:

Monday 13 April 2020

MIDWAY, THE INTELLIGENCE BATTLE & A LESSON


The Battle of Midway took place between June 4th and June 7th, 1942, it marked the turning point in the war against Japan. A massive victory to the US aided by Australian forces.

Recently I watched the latest movie on this subject. It was a blood, guts and glory affair in many ways. The script was lacking, the actors were obviously acting in too many cases but to outweigh those failings the CGI was stunning, it was almost as if you were on those ships or in those aircraft in the height of battle. Bombs, bullets and crashing aircraft littered the screen.

The writers had paid a great deal of attention to historical information as they stitched together a number of individual events depicting great courage and stoicism on both sides of the battle. The USN deckhand who literally used his feet to steer a bomb that had dropped from its underwing mounting on an aircraft and slid across the deck of a carrier, another instance where a seaman, 3rd class, leaped into the rear gunner's position of a deck bound bomber and began firing at a Japanese fighter that was plunging towards him at a rapid rate of knots. His effort resulted in the attacking aircraft being shot up so badly that the pilot missed his target by just a few meters and plunged into the sea alongside the ship. Admiral 'Bull' Halsey saw the event and called for the seaman to his side, he promoted him to Seaman 1st class on the spot.  Another example was the incredible decision by a Japanese officer who elected to go down with his ship when it became too badly damaged to be salvaged and was eventually torpedoed by his own side and sent to a watery grave.


US NAVAL INTELLIGENCE

Whilst the action aspects of the film were fascinating, it was the accounts of just how the Intelligence group 'Station Hypo', based at Pearl Harbour had cracked and uncovered the Japanese plans to hit Midway.

Not the least fascinating aspect was the makeup of the intelligence team, many of whom were musicians from the Band on the USS California which had been badly damaged at Pearl Harbour just 6 months earlier. Commander James Rochefort, who headed up the team, reasoned that their musical abilities made them excellent mathematical problem solvers. Between them, they set to work on the Japanese code JN-25, and successfully identified that there was to be a full-scale attack on Midway.


THE AUSTRALIAN CONNECTION

The US and it's friends had been working assiduously on cracking the Japanese JN-25 code with much of the original work having been carried out pre-war, 1939, in Hong Kong by the Royal Navy's Far East Combined Bureaux a tri-service effort set up to focus on Japanese codes, one of which was designated code 'D'. The US Navy named this code JN-25. Australia's Commander Eric Nave, who had been transferred from the RAN to the Royal Navy, led the code-cracking team at that time. 

Commander, later Captain Nave was the man who wrote the Australian Code Watchers code in the early 40s. 

In May 1941 on his return to the RAN he set up a small Naval Intelligence cryptographic group in Melbourne which was quickly joined with Army Intelligence and became the SIB, The Special Intelligence Bureaux. In 1942 SIB became part of FRUMEL, (Fleet Radio Unit), a combined US, Australian and British intelligence team. Internal politics, including clashes with Commander Rupert Long and US Navy officers, saw Nave sidelined at least for a while.

Commander Nave had a reputation for withholding information on various codes and keys to codes to the extent that some of his colleagues used to look forward to him having a day off when they would find the keys to his safe and help themselves to the information.

It is widely thought that Nave was the RAN intelligence expert that in 1949, examined the Somerton Man code whilst in his home state of South Australia. His earlier reputation could be said to cast some doubt on his published findings.

LESSONS FOR THE SOMERTON MAN CASE

What can be learned from these events and how could that impact the ongoing work on the Somerton Man case? Please bear with me and I will explain.

In one scene of the film, Admiral Nimitz asked Commander Rochefort a question, he wanted to know how they had cracked the Japanese code and how reliable were the findings. He wanted a no gloss version, he wanted facts on which he could base his decisions.

Rochefort responded with an analogy that went something like this:

 'Imagine that we were to organise a party on an island, we would, of course, refer to the island by name, we would set about sending invitations then organising the various items and supplies we would need including food, alcohol, maybe flowers and so on. Well, this is exactly what we have here. From an analysis of coded Japanese radio traffic, we have been able to identify and even confirm the location of an upcoming 'party'. We have identified the location and the various invitees, what they're objectives will be, what items they would be supplying and exactly when and from which direction they will be coming.'

What impressed me most was just how they identified the target. For some time the group had known that the Japanese were planning a major operation in the Central Pacific which would sometimes be referred to as 'AF' and they had suspected that it was Midway but they needed it to be confirmed.

Rochefort gained permission for an 'in the clear' message to be sent from Midway to Navy HQ. The message spoke of problems with the water filtration plant on Midway and they were running out of fresh drinking water. Sure enough, a few days later a Japanese message was intercepted stating that 'AF' was running out of drinking water. The target was Midway and it was confirmed.

LESSONS LEARNED?

Behind all these stories and conclusions reached, was a massive effort, hundreds if not thousands of short messages were intercepted with not all of them being completely decoded. The analysts relied upon collecting small scraps of readable information from all of these messages and gradually built a picture of what was really being planned. Interestingly this was the case with the VENONA coded cables, rarely was a cable completely decoded, they relied on building completed pictures from scraps of decodes.

We can apply much of this lesson to the Somerton Man case and in particular the Code Page. Over the years we have collected small scraps of information from the disguised micro writing found in various locations, including the larger letters of the 'code'.
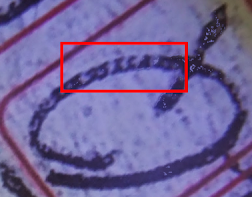
THE LETTER Q

From the letter Q, we have the string XJ232XRANX35XCA23. The letter X is a delineator and the full interpretation is as follows:

1. The J232 was the hull number of HMAS Deloraine and RAN (Royal Australian Navy) corvette

2. The number 35 is somewhat of a challenge, it is possible that it stands for 35 minutes, the time between the Deloraine leaving Sydney Harbour followed by the New Orleans.

2. CA 23 was the hull number of USS New Orleans, a US Navy cruiser that had been badly damaged in battle and arrived in Sydney Harbour on December 24th, 1942 for repairs.

3. From Naval records, specifically the Log of the Deloraine, we know that these two ships were close together in Sydney Harbour on the morning of 7th March 1943 as the New Orleans steamed out toward its homeport at Puget Sound. The Deloraine had been assigned as a screen as the New Orleans departed.

To clarify a point, this information about the two ships was written down in the clear, it was not encoded. That doesn't necessarily mean that all of the information on the code page is in the clear but some quite definitely is.

The telephone numbers

Neither the nurse's telephone number nor that of the bank which was also found was encoded, they were in the clear. In the post previous to this, we published another telephone number, it too was in the clear. Of these telephone numbers, two had an X prefix and one had the prefix CA. These are both Adelaide prefixes, the X is for Somerton, Glenelg, Brighton and the CA was for a central Adelaide number.

The next steps for this blog in regards to telephone numbers, and we do have more, is to source a full list of Adelaide telephone number prefixes and assess how many of the found and yet to be found strings of letters and numbers could be yet more telephone numbers from Adelaide. There is a proviso, we must allow for the fact that some numbers may also be from the Sydney area. That is because the ship movements were from Sydney Harbour in 1943 and the Adelaide numbers were written down between late 46 and late November 1948.

There is much work to be done and it will take time. If others want to take up the challenge, I will be publishing again the instructions on how to uncover the micro code together with examples. It doesn't stop with the code page as you will read in the next post.
Share:

Tuesday 7 April 2020

CODE PAGE, GLENELG TELEPHONE NUMBERS


X4538?  


A few weeks ago, together with Clive, we carried out an exercise of 'what ifs' on the number found in this location. When it was found originally I had thought that it was X3414 which coincided with the number of a tender document related to an aircraft, a Venom which was still on the drawing boards.
This is an image scan taken 5 years ago, as you can see, it's very faint. The tip of the black arrow is pointing directly at the letter X. Mathematicians amongst us might recognise that style of X. (Slightly above and to the right of the main box you can see a circle, it contains the three numbers 250, it's an example of the many instances to be found on the page.) We are barely able to make out X 453 and the last number is very difficult to get into focus. To address this we just used the 0 to 9 possibility range. One number that cropped up was X4538. It turned out to belong to an address 12, Moseley Street as you can see in the image below:


A note, the sketch is a little out because according to more modern map information, number 12 is actually right on the corner of Moseley street and High Street. Two sisters, Misses I and A Heath, occupied the home and they operated a B&B/Guesthouse there during the 40s. Coincidentally, this house was just a few doors away from the SA Secretary of the CPA who lived in High Street. You can check the number on Trove, "The Advertiser" 12 October 1940 page 3. There are other entries into the 1950s for that address.

We checked other number combinations and found a car dealer n the city which supposedly had that number but it was actually C 4538 and not X4538. 

For those interested, here's an older marked-up image of the code page that shows numerous examples of micro writing both in the open spaces and within some of the letters.


Share:

Monday 6 April 2020

SCISSORS OR A LOUPE?


NOTE THE 'TWISTED' HANDLE DESIGN AND COLLAR ATTACHMENT POINT


F W ENGELS HAIRDRESSERS SCISSORS (Shears)

NO COLLAR ATTACHMENT BUT TWISTED DESIGN HANDLES & CENTRE ATTACHMENT


Between 1909 and 1943, the company F. W. Engels on Broome Street, in New York sold Razors, scissors and other blades manufactured by Engelswerk CW in Solingen, Germany. Solingen steel is some of the best in the world and known for its ability to take and hold an edge for a considerable length of time

What we have then is a similar design but no 'collar' attachment. It will be worth searching through Vintage Mail Order catalogues both in the US and Australia up to 1943.


CLOSE-UPSThe German Manufacturing company, Engelwerk CW In Germany closed up in 1943. The NY shop, unable to carry on without its supplier similarly closed in 1943. Amongst other items F./W. Engels, the shop, sold razors and cutlery. They distributed them throughout the US. 


Share:

Friday 3 April 2020

MICRO WRITING EXAMPLES, UPDATED 2nd April 2020


THE CODE PAGE MICRO WRITING


With more than 6000 images taken of the code page and other documents over the past 10 years, I though it would be useful to bring some together on the one page so that people can see for themselves just where examples of micro writing are to be found. It's not only within the letters of the code but also in the 'open spaces' on the page.

As you can see above, I have indicated a point on the top right marked over area that contains two examples, there are more in this same area but for the purpose of this page, I will stick to just these two:

Importantly, whilst I have been showing and demonstrating how this writing may have been executed for at least 8 years now, it is only relatively recently that the words of Detective Brown were made publicly available:

'Len remembers that the code and nurse’s phone number were in the back of the book in pencil. The phone number was in very tiny lettering. Len stated that the phone number was written under the code. (We are now able confirm that the code was indeed on the back dust cover of the book. Len's testimony that the phone number was below that code and not beside it does concur with physical evidence from what we now believe to be the exact size of the book)'

University of Adelaide WIKI

View 1 

A close up of the top right corner but highlighted:


You can see some markings within the red highlighted box but not quite as clear as they could be.


View 2

This is exactly the same image but it is inverted and lightened a little:


Above you can readily see two strings of micro written numbers within the highlighted box.


The upper string appears to read: 

53436359466

The lower string is a bit more interesting as it starts with what looks like a Pound sign :

£25329
When you examine this image closely, you can make out more examples, one a little above the upper string of numbers and the other set os at the base of the image and about centre in the shaded area.

Note

What many have done over the years is to look at this code page as it is first presented i.e. square on and reading top to bottom. The reality is that in practice, the person who wrote this page did so at different angles and with different implements. Thus in this case we inverted an image and in another case, which I will post at a later date the image itself is turned into the negative view.

You are welcome to download these images of course, I used the code page from the Adelaide University WIKI which you can also download.

MORE EXAMPLES

The first two examples, letters 'A' and "Q', in this section were taken using UV lighting and oblique, macro lens, camera angles.


The image below of the letters T and G from the last line of the code (taken in 2015) were also using macro lens camera and UV lighting turned to greyscale:


In the next post I will:

1. Describe the process used to access the corner image and number strings.
2. Show images that give us an indication of just who might have written the page.
Share:

WHO WROTE THE CODE PAGE?


THE CODE PAGE, THE LETTER 'R'


In my view each and every letter and marking tell us a story, in this case the letter 'R' is highlighted, this post reveals just who may have written the code page but not just that as you will see.

VERSE 70, THE LETTER 'R'


Two separate documents written at different times, this document, Verse 70 inscribed into a fly leaf of a copy of the Rubaiyat of Omar Khayyam, is said to have been written by Jess in 1945. It also contains a highlighted letter 'R'.

The letters compared:

In 2015 I believe, I compared both the letters in a side by side image, here's an updated version:


The Leter R on the left is from the code page and on the right, it is taken from the Verse 70 the word 'Repentance'. I have enlarged the letter R from verse 70 to get a more balanced view. You can clearly see that the example R, on the right is sloped, that's because it was written in cursive. The R on the left like the other letters on the code page, was block caps. The construction of both letters is very similar apart from the cursive issue.

The conclusion is that just maybe, the person who wrote the code page also wrote Verse 70. Is it conclusive, no but with corroborative evidence? Time will tell.

IMPORTANT

The date we have put on the letter Q on the code page is March 1943, that's as a result of finding the code letters RANXJ232XRANXCA32 within the Q. The J232 was the RAN ship HMAS Deloraine and the CA 32 was the USS New Orleans. The only time that these two ships were together was on March 7th 1943 when the NEW ORLEANS having been repaired, left Sydney Harbour for Puget Sound. The Deloraine acted as escort for some way into that journey.

Note also that on that date, Lieutenant Alf Boxall were in Sydney. Jess was. According to Paul Lawson, Alf and Jestyn were capturing and sending ship movement details to each other.


Share:

ABOUT US and OUR RECORD

Learn more about, when the blog started our location plus a long list of 'finds' and new evidence discovered by this blog