UPDATED
15th January 2019
I thought that with all of the comments and posts on the issue of the code page it would be helpful to review long-standing information, this particular page was first published on 30th July 2014, 4.5 years ago.
In it you will read of how the code page photograph was taken, you'll also see that it was a glass plate image which always turns out negative in the first instance. That means that the background page image would have been black and the darker markings would have been white. As Gerry Feltus once told me part of the process was to turn the image negative, that means that the original negative glass plate was photographed and in turn, it was changed to a negative photographic image. The background code page would now be far lighter in colour and the paler markings were turned black. That is what is seen beneath the marked over letters and the lines.
You can read what was very probably used to do the markings, it was a particular kind of marker invented by a Benjamin Paskach, it was known as a fountain pen brush and had a sponge tip. That information appears in this blog post. dated 23rd July 2014.
Brush pens or felt tip pens were around in 1944 for certain and were sold in the US and elsewhere, they were not patented but the patent was applied for. It is thought that they may even have been around in the late 1930s. They were in use by US servicemen for example.
 |
Date appears to be 1946 on this flyer |
 |
Example Speedry brush pen |
 |
Popular Mechanics February 1944 Ad for agents |
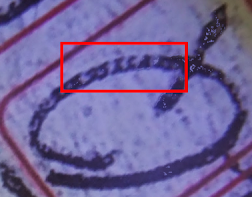
But, as per the much earlier posts, my view is that the mark over was done by a member of the police using a brush and more than likely directly on to the surface of a finished photograph. You can see evidence of brush marking by virtue of the number of instances where quite fine lines have been marked. In fact here's an exercise, can you spot the tiny arrow and what it is pointing to?
It is entirely possible that a brush pen may have been used to mark over the laundry marks on SM's pants.
Yet again. old information is being regurgitated dated 23rd July 2014 and various blogs and commenters are proudly announcing their 'new finds'. I do wish they would get up to speed and find something genuinely new, there's more out there.
Time for me to go, as might be expected, it's troll season again and I have lots to do and forms to fill in.
Time for me to go, as might be expected, it's troll season again and I have lots to do and forms to fill in.
The Code Page Was A Photographic Plate Negative
 This is a post that clarifies how the image of the code page was created by the SA Police. Based on the advice of Gerry Feltus that the Code page image was a negative and it involved the revealing of indentations on the page. As you will read, it looks now to be that what we see is the result of the then Police practice of using photographic plates, not film, to take evidentiary images.
First an example of how the micro writing was done and the process of making it visible follows that used by SA Police in 1948. To be fair, I do not have the same kinds of equipment including camera, lighting and photographic processing that existed in that time and defintely not the skills. Please note the image below is of indentations in the negative view and not directly written characters.
 |
| Rotated 90 Deg showing effects of lighting |

For the purpose of the exercise I used some very basic tools including a standard digital camera (Pentax OPTIO VS 20), a fluro light, a couple of HB pencils, (one very sharp and the other less so) and finished the process off using a free photo editing tool. The tools used by Jimmy Durham, the orginal photographer for the Somerton Man case, at the time were far superior to what I have here even now. Lighting is a big issue, from what I can see in the original code page, oblique lighting was used around the image and from different angles, very probably a lightbox.. I apologise in advance for the low quality of the images here but they will improve as I now have access to equipment very similar to that used at the time and the assistance/guidance of a forensic photographer.You should also try this yourselves and if there's any further information you need then please message me or leave a comment.
The Steps:
1. I wrote the letter A down, on a sheet of standard 100 gsm copy paper, at a size of approximatley 5mm in height. I used fly leaf of a 1942 book to rest on whilst I wrote the letter A and its later added micro writing example2. I then wrote within the bounds of the strokes of the letter with micro writing. The letters and numbers were in the .5mm range in height.
3. The indentations left by the writing I had done were visible as in the left image without first drawing the outline of a letter 'A' with just micro writing in the shape of the letter then took another photo using an outline of the letter A as a template and into which I entered the microwriting as per the image on the right above.
4. I took a photographs first of the indentations without shading and then of the shaded area and then turned them to negative using Paint Net, a free photo editing software that I can thoroughly recommend.
5. As you can see the indentations made by the micro writing show up as a very dark grey to black.
You may see other markings surrounding the A, these are background noise and are clearly not as well formed or visible as the micro writing shown.
For the record the 1942 book is in fact a copy of Mission To Moscow written by Joseph E Davies a one time US Ambassador to Moscow.
As a matter of interest, I recently had a discussion with Professor Abbott at Adelaide University when I stated that it was very possible that on the one image you could have authentic micro writing and the presence of digital noise. This image proves that statement.
SA Police Photography Method
The following describes the process that I believe was followed by the SA Police photographer for the Somerton Man case, Jimmy Durham.
Photographic plates turn out as negative in the first instance and the code page is an image/photograph of the negative plate that was used.

This explains the darkened areas to the left and right that we see at the top of the code page image above and to the lower right adjacent to and slightly lower to the last letter in the last line as you look at the page.
Below you will see the image of a photographic plate, notice how light in colour and how detailed the left hand side and lower central area of the image is. All that was dark is turned a lighter colour and all that was light has become a darker colour:

What this means is that the code page was:
1. Photographed and processed using the photographic plate method
2. Which captured and displayed extremely fine detail for the image as a negative
3. Which highlighted the lighter coloured indentations on the page
4. Which was now a darker colour in the image, due to it being a negative.
5. The resultant negative photographic plate was photographed
6. The now darkened indentation marks, micro letters and numbers, that showed on the plate and now on the photograph were traced over by the Police giving us the larger letters of the code that we see today.
5. The end results are that the micro letters and numbers within the larger 'code' letters show up as indentations and appear as black in colour on the code page photograph.
The micro writing or micro code was first discovered by the author if this blog, Gordon Cramer, almost 3 years ago and has been the subject of numerous attempts to discredit it without success. There is micro writing within the larger code letters and this post proves how it was done.
You can verify this with an expert in Police Photography methods of the 1940s.
Below you will see the image of a photographic plate, notice how light in colour and how detailed the left hand side and lower central area of the image is. All that was dark is turned a lighter colour and all that was light has become a darker colour:
I don't profess to be an expert in photography, but for me the image above with its shades and textures is a good indicator of how the page from the Omar book was created/photographed using a photographic plate process. These photographic plates respond to 2% of light received, are well suited to research quality images, extremely stable and less likely to bend or distort especially for wide field imaging, read more here: http://en.wikipedia.org/wiki/Photographic_plate
What this means is that the code page was:
1. Photographed and processed using the photographic plate method
2. Which captured and displayed extremely fine detail for the image as a negative
3. Which highlighted the lighter coloured indentations on the page
4. Which was now a darker colour in the image, due to it being a negative.
5. The resultant negative photographic plate was photographed
6. The now darkened indentation marks, micro letters and numbers, that showed on the plate and now on the photograph were traced over by the Police giving us the larger letters of the code that we see today.
5. The end results are that the micro letters and numbers within the larger 'code' letters show up as indentations and appear as black in colour on the code page photograph.
The micro writing or micro code was first discovered by the author if this blog, Gordon Cramer, almost 3 years ago and has been the subject of numerous attempts to discredit it without success. There is micro writing within the larger code letters and this post proves how it was done.
You can verify this with an expert in Police Photography methods of the 1940s.


1. Turn the image of the code page negative, you'll see the same 'stuttering' effect on many letters and that's not all you'll see.
ReplyDelete2. Think epidiascope and transparencies and how such transparencies were sometimes machine reproduced, the ink needed to dry almost instantly, those used for reproduction purposes had a surface coating to aid the drying process. Similar stuff is still used today. The practice was to write on these so you wouldn't really notice the drag effect produced by the surface coating, however a brush is different to a pen.